クレジット情報やユーザログインなどセンシティブな入力がある場合に必須であったSSL通信ですが、最近ではどんなサイトでもSSL化する流れにあります。今回は、WordPressサイトをSSL化する際に必要なポイントをまとめてみました!
サーバーでSSLを設定する
このブログではUbuntu14.04にNginxを乗っけてWordPressを動かしています。Ubuntu14.04のNginx環境で、SSLを導入する方法は以下の記事にまとめました!
Ubuntu 14.04 + Nginx環境にてopenSSLを設定する手順まとめ
簡単な流れを説明すると、
- Ubuntuにて秘密鍵を生成
- 認証局でSSLの証明書を発行
- Ubuntuに証明書を設置
こんな感じの設定が終わっている前提で進めていきます。
WordPressの設定を変更
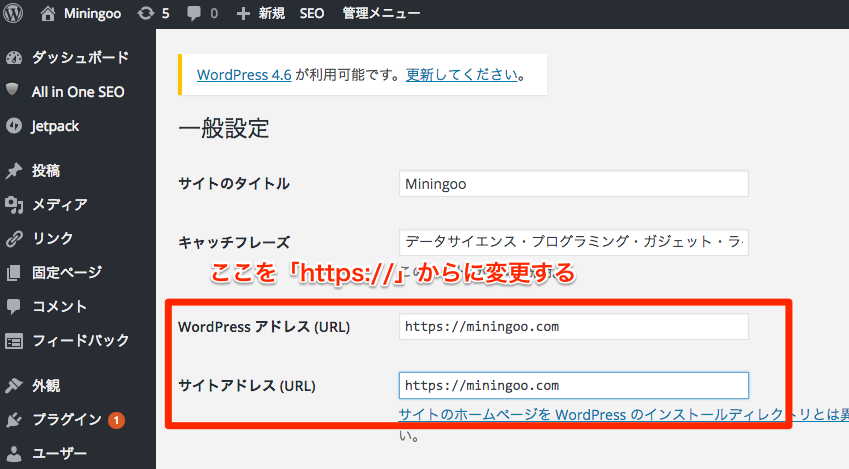
WebサイトのURLをhttp://からhttps://に変更する
設定 > 一般にアクセスして、「WordPressアドレス(URL)」と「サイトアドレス(URL)」をhttps//に変更する
リダイレクトの設定
apacheやnginxのconfファイルでリダイレクト設定
ポイントはwwwありなしをしっかり決める
例えば、wwwなしに統一するのであれば、以下の4パターンをしっかり記述
http://www.example.comへのアクセスはhttps://example.comへhttp://example.comへのアクセスはhttps://example.comへhttps://www.exmaple.comへのアクセスはhttps://exmple.comへhttps://example.comへのアクセスは/var/www/wordpressディレクトリへ
server {
        listen       80;
        server_name       www.miningoo.com;
        rewrite ^(.*)$ https://miningoo.com$1 permanent;
}

server {
        listen       80;
        server_name      miningoo.com;
        rewrite ^(.*)$ https://miningoo.com$1 permanent;
}

server {
        listen       443;
        server_name       www.miningoo.com;
        rewrite ^(.*)$ https://miningoo.com$1 permanent;

        ssl on;
        ssl_certificate 中間証明書;
        ssl_certificate_key 秘密鍵;

        ssl_session_timeout 5m;

        ssl_protocols SSLv3 TLSv1 TLSv1.1 TLSv1.2;
        ssl_ciphers "HIGH:!aNULL:!MD5 or HIGH:!aNULL:!MD5:!3DES";
        ssl_prefer_server_ciphers on;

        location / {
                index  index.php index.html index.htm;
                try_files $uri $uri/ /index.php?$uri&$args;
        }

        location ~ \.php$ {
                fastcgi_pass  unix:/var/run/php5-fpm.sock;
                fastcgi_index   index.php;
                fastcgi_param SCRIPT_FILENAME $document_root$fastcgi_script_name;
                include        fastcgi_params;
                fastcgi_param FUEL_ENV production;
        }

}

server {
        listen 443 ssl;
        server_name miningoo.com;

        root /var/www/miningoo.com;
        index index.html index.php;
        access_log      /var/log/nginx/ssl.miningoo.com.access.log;
        error_log       /var/log/nginx/ssl.miningoo.com.error.log;

        ssl on;
        ssl_certificate 中間証明書;
        ssl_certificate_key 秘密鍵;

        ssl_session_timeout 5m;

        ssl_protocols SSLv3 TLSv1 TLSv1.1 TLSv1.2;
        ssl_ciphers "HIGH:!aNULL:!MD5 or HIGH:!aNULL:!MD5:!3DES";
        ssl_prefer_server_ciphers on;

        location / {
                index  index.php index.html index.htm;
                try_files $uri $uri/ /index.php?$uri&$args;
        }

        location ~ \.php$ {
                fastcgi_pass  unix:/var/run/php5-fpm.sock;
                fastcgi_index   index.php;
                fastcgi_param SCRIPT_FILENAME $document_root$fastcgi_script_name;
                include        fastcgi_params;
                fastcgi_param FUEL_ENV production;
        }
}
内部リンクを内部リンクをSearch Regexで全て置換する
1. 「Search Regex」プラグインを追加
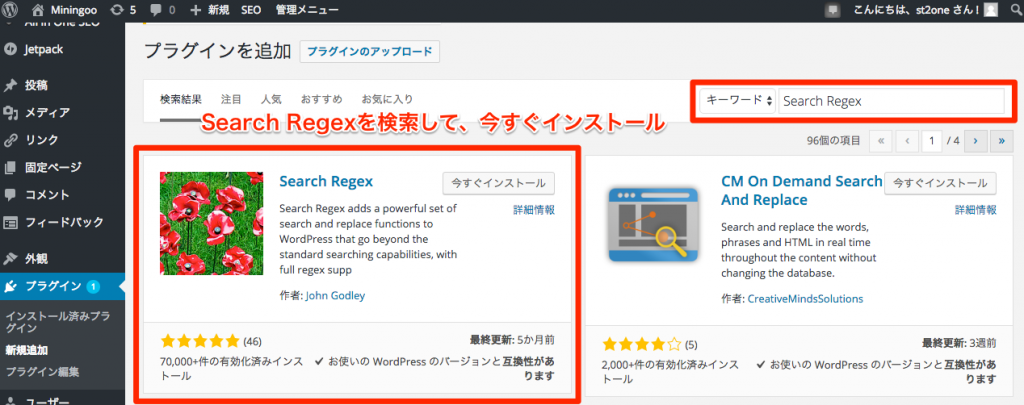
2. ツール > Search Regexにアクセス
3. URLを入力して一括置換
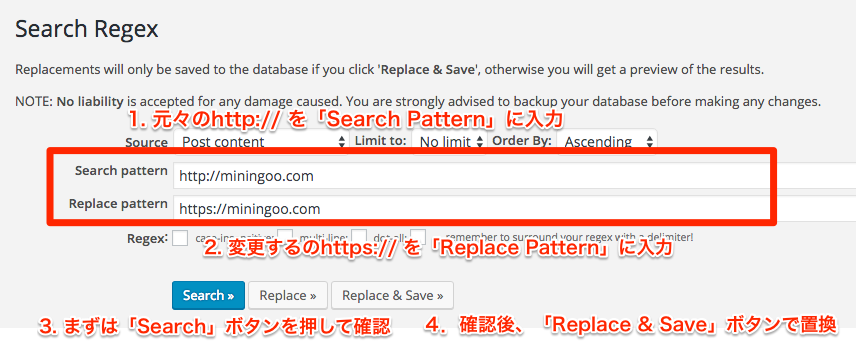
Search patternにhttp://のURLを入力
Replace patternにhttps://のURLを入力
まずは、Searchボタンを押して確認する
確認後、Replace & Saveボタンを押して一括置換
Widgetとかにも注意
「Search Regex」プラグインは投稿まわりしか置換できない
Widgetにもhttp://のURLが残っている可能性があるのでcheckする
Google Search Consoleにhttps://バージョンも設定する
リダイレクトで設定した4つのバージョンを登録する
最終的に使用するURLを設定
参考
WordPressの常時SSLとhttpsリダイレクト!SSL証明書をエックスサーバーで取得
WordPressをhttpからhttpsにSSL化した全手順まとめ(エックスサーバー環境)